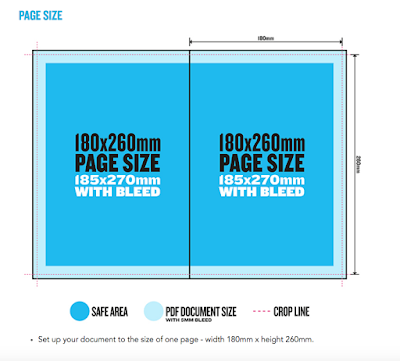
Always go to file-new, new document
Much more likely to enter a custom page size with width and height.
Always work at actual size. Never expect to enlarge or shrink the document.
Columns and margins are very useful; allow us to put guides on each page of document that will assist us putting the content on the page.
Gutter is the space between the columns.
Margins; specify a border around the inside of each page. E.g. if you're working with a lot of text or a newspaper layout. Framing content in white space enhances readability. Don't have to use them on every page.
Bleed- full bleed is without a margin. Compensates for any inaccuracies in the trimming of our print. Trimming is always a part of the production process, particularly when making books.
Standard bleed amount is 3mm.
Slug- Another area that you can set which sits outside of the page. Not as common as bleed. Generally about 2cm. Allows us to include printers parks i.e. crop marks, trim marks etc that aren't part of the layout. Gate fold can be used with slug.
Trim marks/fold marks can be added when sent through to print.
Thinking about printing
Printing A4? Must print on oversize A3 (SRA3) or A2 to include crop marks and full bleed at actual size.
Choosing a size smaller than A4? Can print on A3 with crop marks, on any printer in College.
Number of pages is determined by the content. How the book is going to be bound has a consequence on the number of pages.
Most popular binding method is saddle stitch. Has to be a multiple of 4.
Facing pages: If you're making a book, tick this box.
Readers Spread: How the book will be once it is printed, bound and you are reading it.
Printers Spread: Pages are re-ordered to print in the correct order. Indesign will do this for us but it is useful for us to calculate and know how these work. They will always add up to one number higher than the number of pages.
Printing to a laser printer:
File-Print Booklet
Booklet Type: 2-up Saddle Stitch
2-up Perfect Bound: Single sheets of paper, which allows the book to open flat. This is also useful when using heavier stock.
Creep Value: (heavier stock) Make a mock up of each section on the stock you will use and measure how much the middle pages stick out, e.g. 5mm, put -5 in the creep box. Amazing!
More apparent on the centre spread of the document.
Full bleed? Creep isn't an issue. Creep is only an issue really when using margins as it becomes more apprarent.
Photoshop image preparation
1. 300ppi
2. Actual size
3. CMYK or greyscale
4. Save as .tif or .psd, NOT .JPG
Get image onto page: File-Place
Creating frame in advance: Make empty frames on the pages.
Rectangle frame tool
Object-Fitting-Fill Frame/Content Proportionally (makes the image fit the frame)
When we change the size of the image in InDesign, it changes the resolution.
I
nformation about image size? - Links palette
Need effective PPI to be 300
Scale Percentage: How much the resolution has changed in InDesign
File-Package: Makes sure that all of the images are in the same folder as the document.
Context
If we were using an external printer. www.newspaperclub.com
Includes a specification to follow, OR an InDesign template


No comments:
Post a Comment